Digital Services : country and language
-
Prerequisites
To perform this tutorial, you will need the following:
- AWS CLI
- AWS Account and User
- AWS CDK Toolkit
- IDE for Java/Kotlin (Intellij in this case)
- Gradle
- Kotlin
- Java
- IAM user with the right credentials to deploy
-
Why this Tutorial for Kotlin and Gradle?
That is because I saw that while there are good blogs out there, there is not a structured workshop like the https://cdkworkshop.com/ for Kotlin and Gradle. So I aim to introduce a section that can work as a seed project for a CDK, Kotlin and Gradle project in the same stile as the workshops in the link.
-
What is CDK?
The AWS CDK is a relatively new software development framework from AWS with the sole purpose of making it fun and easy to define cloud infrastructure in your favorite programming language and deploy it using AWS CloudFormation.
-
Create a new project in Intellij for Kotlin and Gradle.
Follow the wizard and create a project.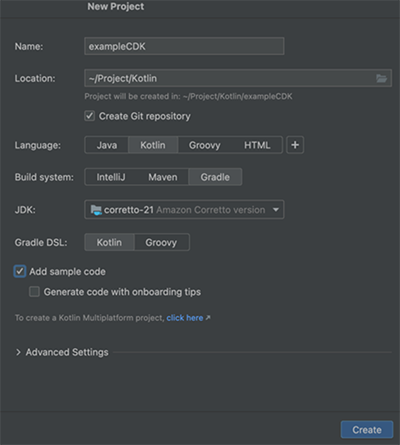
-
When you have created the project it should look something like this:

The main stack
Then create a new file that will be our CDKStack that will look like this:
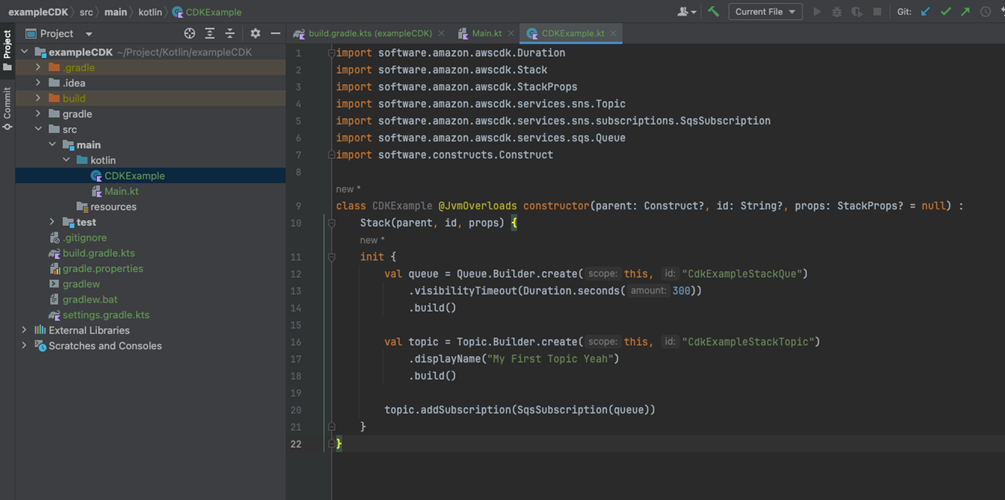
Here we have created a stack with:
- SQS Queue
- SNS Topic
- Subscribing to the queue to recive any messages published to the topic.
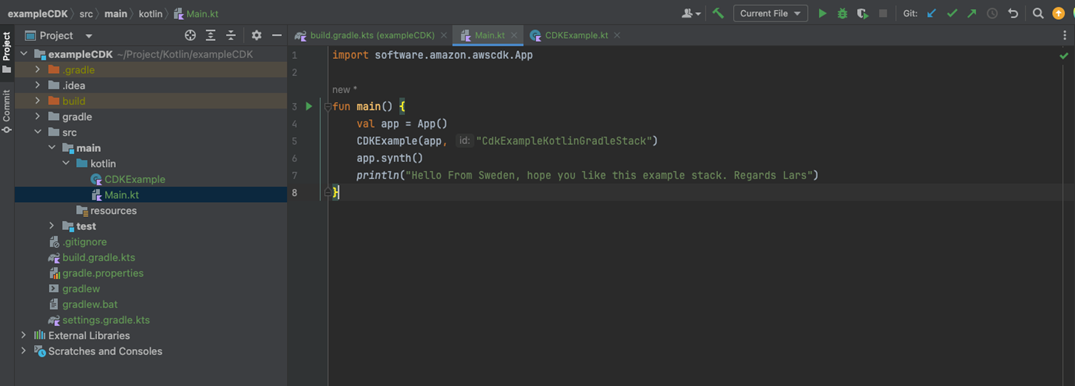
App’s entry point
This code loads and instantiates the CDKExample stack above.
CDK json
After that, a file called cdk.json is needed in the project structure to tell CDK how to use Gradle to build the project in the deployment phase. It also includes extra context that can be modified. Create a file called cdk.json in the root folder of your project and populate it with this:
{
"app": "./gradlew build run",
"context": {
"@aws-cdk/core:stackRelativeExports": "true",
"@aws-cdk/aws-ecs-patterns:removeDefaultDesiredCount": true
}
}
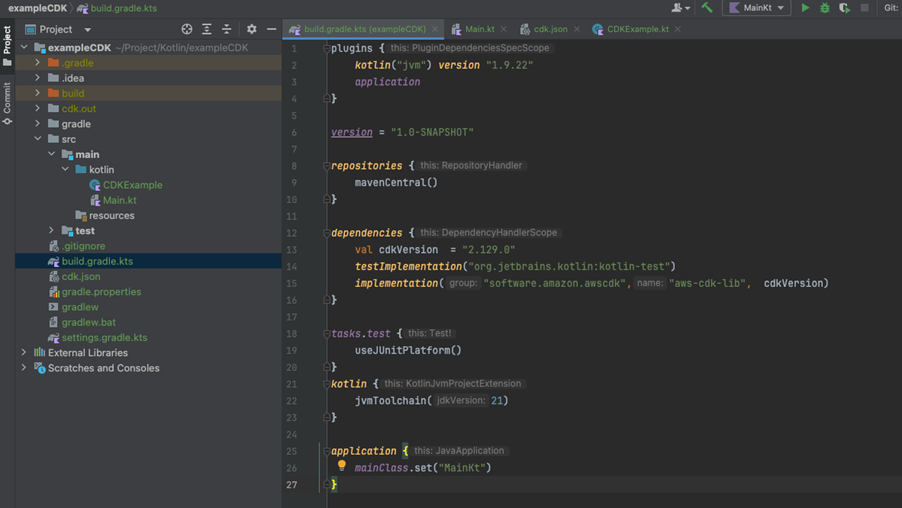
Gradle build file
Your Gradle build file should look like this when you are ready to deploy.
Synthesize a template from your app
AWS CDK apps are effectively only a definition of your infrastructure using code. When CDK apps are executed, they produce (or “synthesize”, in CDK parlance) an AWS CloudFormation template for each stack defined in your application.
To synthesize a CDK app, use the cdk synth command.
When we run cdk synth we will output the following CloudFormation template:
Resources:
CdkExampleStackQue76456D13:
Type: AWS::SQS::Queue
Properties:
VisibilityTimeout: 300
UpdateReplacePolicy: Delete
DeletionPolicy: Delete
Metadata:
aws:cdk:path: CdkExampleKotlinGradleStack/CdkExampleStackQue/Resource
CdkExampleStackQuePolicy7117063B:
Type: AWS::SQS::QueuePolicy
Properties:
PolicyDocument:
Statement:
- Action: sqs:SendMessage
Condition:
ArnEquals:
aws:SourceArn:
Ref: CdkExampleStackTopic935606F2
Effect: Allow
Principal:
Service: sns.amazonaws.com
Resource:
Fn::GetAtt:
- CdkExampleStackQue76456D13
- Arn
Version: "2012-10-17"
Queues:
- Ref: CdkExampleStackQue76456D13
Metadata:
aws:cdk:path: CdkExampleKotlinGradleStack/CdkExampleStackQue/Policy/Resource
…
Setup CDK for deployment
Now that we got a CloudFormation template it is time to deploy it to our account.
Bootstrapping an environment
The first time you deploy an AWS CDK app into an environment (account), you’ll need to install a “bootstrap stack”. This stack includes resources that are needed for the toolkit’s operation. For example, the stack includes an S3 bucket that is used to store templates and assets during the deployment process.
You can use the cdk bootstrap command to install the bootstrap stack into an environment (your account).
Let’s deploy
Navigate to the folder of your project in a CLI or go to the Terminal section in Intellij.
There let’s run cdk deploy that will generate this out put:
This deployment will make potentially sensitive changes according to your current security approval level (--require-approval broadening).
Please confirm you intend to make the following modifications:
IAM Statement Changes
┌───┬───────────────────────────┬────────┬─────────────────┬───────────────────────────┬─────────────────────────────────────────────────────────────┐
│ │ Resource │ Effect │ Action │ Principal │ Condition │
├───┼───────────────────────────┼────────┼─────────────────┼───────────────────────────┼─────────────────────────────────────────────────────────────┤
│ + │ ${CdkExampleStackQue.Arn} │ Allow │ sqs:SendMessage │ Service:sns.amazonaws.com │ "ArnEquals": { │
│ │ │ │ │ │ "aws:SourceArn": "${CdkExampleStackTopic}" │
│ │ │ │ │ │ } │
└───┴───────────────────────────┴────────┴─────────────────┴───────────────────────────┴─────────────────────────────────────────────────────────────┘
(NOTE: There may be security-related changes not in this list. See https://github.com/aws/aws-cdk/issues/1299)
Do you wish to deploy these changes (y/n)?
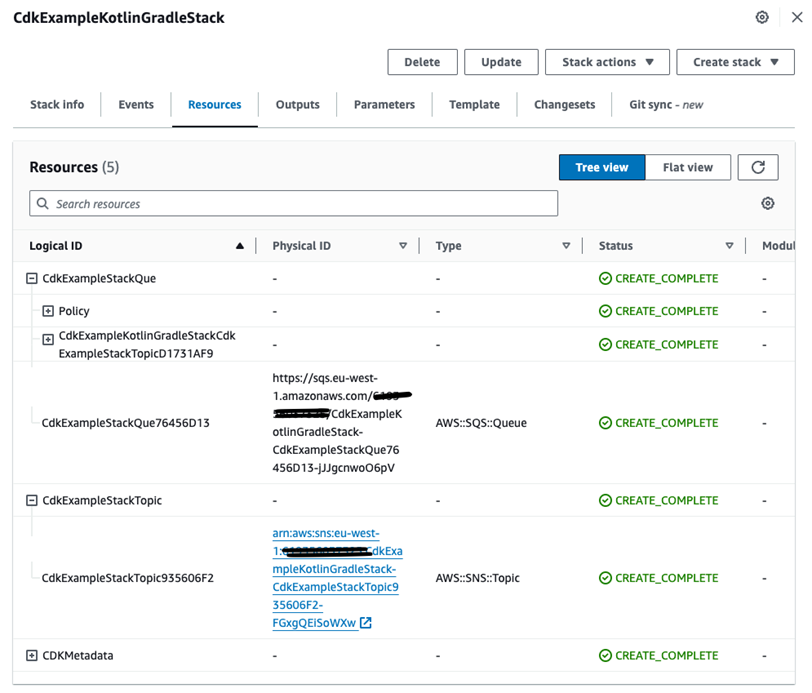
Verify the deployment
Navigate to the region in the account which you deployed to. There you should now see your stack deployed in the CloudFormation service. Like this:

In the stack we can also see the events that happened during the deployment. Aswell as the resources that where deployed.
Clean up
Let us clean up and destroy the stack. So we go to the CLI/Terminal where we deployed the project and then run cdk destroy to clean up the enviroment and destroy the resources we just created.
Are you sure you want to delete: CdkExampleKotlinGradleStack (y/n)?
Press “y” and continue.
You will then see output like this:
CdkExampleKotlinGradleStack: destroying... [1/1]
11:15:22 AM | DELETE_IN_PROGRESS | AWS::CloudFormation::Stack | CdkExampleKotlinGradleStack
11:15:26 AM | DELETE_IN_PROGRESS | AWS::SNS::Topic | CdkExampleStackTopic
11:15:26 AM | DELETE_IN_PROGRESS | AWS::SQS::Queue | CdkExampleStackQue
Then after a succesfull delete you will get confirmation like this:
✅ CdkExampleKotlinGradleStack: destroyed
You can verify this by going in to the account and check that it still isn’t there and the resources are deleted as expected.
Summary
In this tutorial you learnt how to set up a Kotlin and Gradle project in Intellij that runs CDK. The connections and settings needed for it to connect up and then deploy as well as destroy the stack.